文件查找
查看命令所属文件
1
2
|
root@ubuntuserver:~# which ip
/usr/sbin/ip
|
查找文件
 1
 2
 3
 4
 5
 6
 7
 8
 9
10
11
12
13
14
15
16
17
18
19
20
21
22
23
24
25
26
27
28
29
30
31
32
33
34
35
36
37
38
39
40
41
42
43
44
45
46
47
48
49
50
51
52
53
54
|
按文件名
find [options] [path...] [expression]

[root@localhost ~]# find /etc -name "ifcfg-eth0"
[root@localhost ~]# find /etc -iname "ifcfg-eth0"     # -i忽略大小写
[root@localhost ~]# find /etc -iname "ifcfg-eth*"

按文件大小
[root@localhost ~]# find /etc -size +3M                 # 大于3M
[root@localhost ~]# find /etc -size 3M
[root@localhost ~]# find /etc -size -3M
[root@localhost ~]# find /etc -size +3M -ls             # -ls找到的处理动作

指定查找的目录深度:
-maxdepth levels
[root@localhost ~]# find / -maxdepth 5 -a  -name "ifcfg-eth0"  # -a并且,-o或者,不加-a,默认就是-a


按时间找(atime,mtime,ctime):
[root@localhost ~]# find /etc -mtime +3                 # 修改时间超过3天
[root@localhost ~]# find /etc -mtime 3                  # 修改时间等于3天
[root@localhost ~]# find /etc -mtime -3                 # 修改时间3天以内


按文件属主、属组找:
[root@localhost ~]# find /home -user egon               # 属主是egon的文件
[root@localhost ~]# find /home -group it                # 属组是it组的文件
[root@localhost ~]# find /home -user egon -group it
[root@localhost ~]# find /home -user egon -a -group it  # 同上意思一样
[root@localhost ~]# find /home -user egon -o -group it
[root@localhost ~]# find /home -nouser  # 用户还存在,在/etc/passwd中删除了记录
[root@localhost ~]# find /home -nogroup  # 用户还存在,在/etc/group中删除了记录
[root@localhost ~]# find /home -nouser -o -nogroup


按文件类型
[root@localhost ~]# find /dev -type f                       # f普通
[root@localhost ~]# find /dev -type d                       # d目录
[root@localhost ~]# find /dev -type l                       # l链接
[root@localhost ~]# find /dev -type b                       # b块设备
[root@localhost ~]# find /dev -type c                       # c字符设备
[root@localhost ~]# find /dev -type s                       # s套接字
[root@localhost ~]# find /dev -type p                       # p管道文件

根据inode号查找:-inum n
[root@localhost ~]# find / -inum 1811

按文件权限:
[root@localhost ~]# find . -perm 644 -ls
[root@localhost ~]# find . -perm -644 -ls
[root@localhost ~]# find . -perm -600 -ls
[root@localhost ~]# find /sbin -perm -4000 -ls      # 包含set uid
[root@localhost ~]# find /sbin -perm -2000 -ls      # 包含set gid
[root@localhost ~]# find /sbin -perm -1000 -ls      # 包含sticky
|
找到后的处理动作
 1
 2
 3
 4
 5
 6
 7
 8
 9
10
11
12
|
-print
-ls
-delete
-exec
-ok
[root@localhost ~]# find /etc -name "ifcfg*" -print  # 必须加引号
[root@localhost ~]# find /etc -name "ifcfg*" -ls
[root@localhost ~]# find /etc -name "ifcfg*" -exec cp -rvf {} /tmp \;  # 非交互
[root@localhost ~]# find /etc -name "ifcfg*" -ok cp -rvf {} /tmp \;  # 交互

[root@localhost ~]# find /etc -name "ifcfg*" -exec rm -rf {} \;
[root@localhost ~]# find /etc -name "ifcfg*" -delete  # 同上
|
find 配合 xargs
1
2
3
4
5
|
[root@localhost ~]# find . -name "egon*.txt" |xargs rm -rf

[root@localhost ~]# find /etc -name "ifcfg-eth0" |xargs -I {} cp -rf {} /var/tmp
[root@localhost ~]# find /test -name "ifcfg-ens33" |xargs -I {} mv {} /ttt
[root@localhost ~]# find /ttt/ -name "ifcfg*" |xargs -I {} chmod 666 {}
|
文件管理之上传下载
wget
1
2
3
4
|
wget -O 本地路径 远程包链接地址  # 将远程包下载到本地,-O指定下载到哪里,可以生路-O 本地路径

# ps:如果wget下载提示无法建立SSL连接,则加上选项--no-check-certificate
wget --no-check-certificate -O 本地路径 远程包链接地址
|
curl
 1
 2
 3
 4
 5
 6
 7
 8
 9
10
11
|
#curl命令是一个利用URL规则在命令行下工作的文件传输工具。它支持文件的上传和下载,所以是综合传输工具,但按传统,习惯称curl为下载工具。作为一款强力工具,curl支持包括HTTP、HTTPS、[ftp]等众多协议,还支持POST、cookies、认证、从指定偏移处下载部分文件、用户代理字符串、限速、文件大小、进度条等特征。做网页处理流程和数据检索自动化,curl可以祝一臂之力。

[root@localhost ~]# curl -o 123.png https://www.xxx.com/img/hello.png

# ps: 如果遇到下载提示无法简历SSL链接,使用-k选项或者--insecure
curl -k -o 123.png https://www.xxx.com/img/hello.png

# 下载远程脚本并直接在本地执行
# 你可以在远程在test.sh所在的文件夹下执行python3 -m http.server 8899启动一个服务,Python2则用python2 -m SimpleHTTPServer 8899
# 然后在本地执行(注意关闭防火墙与selinux)
curl -s http://192.168.71.206:8899/test.sh | bash  # -s代表静默模式,会屏蔽掉curl命令本身的输出
|
sz、rz
1
2
3
4
5
6
7
8
9
|
# 系统默认没有该命令,需要下载:yum install lrzsz -y

将服务器上选定的文件下载/发送到本机
sz bak.tar.gz

弹出一个文件选择窗口,从本地选择文件上传到服务器
rz

rz -E # -E如果目标文件名已经存在,则重命名传入文件。新文件名将添加一个点和一个数字(0..999)
|
文件管理之输出与重定向
输出即把相关对象通过输出设备(显示器等)显示出来,输出又分正确输出和错误输出
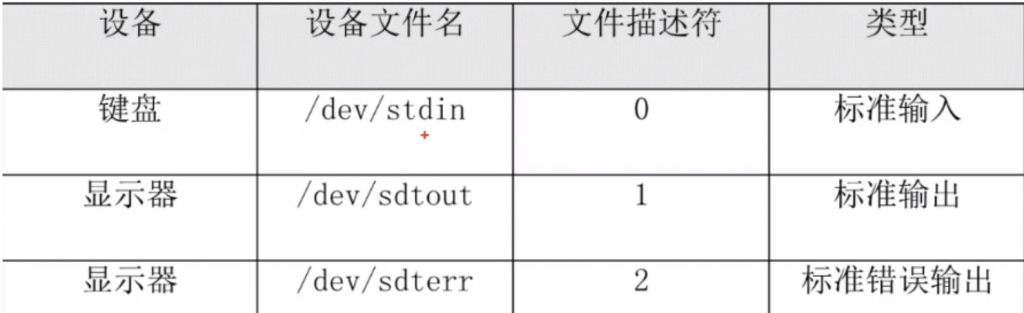
一般情况下标准输出设备为显示器,标准输入设备为键盘。
linux中用文件标识符
- 0代表标准输入
- 1代表标准正确输出
- 2代表标准错误输出
输出重定向 :
正常输出是把内容输出到显示器上,而输出重定向是把内容输出到文件中,>代表覆盖,»代表追加
Ps:标准输出的1可以省略
例如:ifconfig > test.log 即把ifconfig执行显示的正确内容写入test.log.当前页面不再显示执行结果。
注意:错误输出重定向>与»后边不要加空格
1
2
3
4
5
6
7
8
|
1、下述两个命令作用相同
命令 >>file.log 2>&1
命令 &>>file.log

2、正确日志和错误日志分开保存
命令 >>file1.log 2>>file2.log

3、系统有个常见用法 ls &>/dev/null 正确输出或错误输出结果都不要。(null可以理解为黑洞或垃圾站)
|
输入重定向:
 1
 2
 3
 4
 5
 6
 7
 8
 9
10
11
12
13
14
15
16
17
18
19
20
21
22
|
#没有改变输入的方向,默认键盘,此时等待输入
[root@egon ~]# tr 'N' 'n'
No
no

[root@egon ~]# tr 'N' 'n' < file.txt

#没有改变输入的方向,默认键盘,此时等待输入
[root@egon ~]# grep 'root'
oldboy
root
root

[root@egon ~]# grep 'root' < /etc/passwd
root:x:0:0:root:/root:/bin/bash

# 读写块设备
[root@egon ~]# dd if=/dev/zero of=/file1.txt bs=1M count=20
[root@egon ~]# dd </dev/zero >/file2.txt bs=1M count=20

# mysql如何恢复备份,了解即可,不用关注。
[root@qls ~]# mysql -uroot -p123 < bbs.sql
|
文件管理之字符处理命令
sort
用于将文件内容加以排序
- -n # 依照数值的大小排序
- -r # 以相反的顺序来排序
- -k # 以某列进行排序
- -t # 指定分割符,默认是以空格为分隔符
1
2
3
4
5
6
7
|
[root@localhost ~]# sort -t ":" -n -r -k2 file.txt
f:11
e:5
a:4
b:3
c:2
d:1
|
uniq
用于检查及删除文本文件中重复出现的行列,一般与 sort 命令结合使用
- -c # 在每列旁边显示该行重复出现的次数。
- -d # 仅显示重复出现的行列。
- -u # 仅显示出一次的行列。
1
2
3
|
[root@localhost ~]# sort file.txt | uniq -d
123
hello
|
cut
cut命令用来显示行中的指定部分,删除文件中指定字段
- -d # 指定字段的分隔符,默认的字段分隔符为"TAB";
- -f # 显示指定字段的内容;
1
2
3
4
|
[root@localhost ~]# head -1 /etc/passwd
root:x:0:0:root:/root:/bin/bash
[root@localhost ~]# head -1 /etc/passwd | cut -d ":" -f1,3,4,6
root:0:0:/root
|
tr
替换或删除命令
1
2
3
4
5
|
[root@localhost ~]# head -1 /etc/passwd |tr "root" "ROOT"
ROOT:x:0:0:ROOT:/ROOT:/bin/bash
[root@localhost ~]#
[root@localhost ~]# head -1 /etc/passwd |tr -d "root"
:x:0:0::/:/bin/bash
|
wc
统计,计算数字
- -c # 统计文件的Bytes数;
- -l # 统计文件的行数;
- -w # 统计文件中单词的个数,默认以空白字符做为分隔符
1
2
|
[root@localhost ~]# grep "hello" file.txt \|wc -l|
2
|
文件管理之打包压缩/大文件切分
打包压缩
1. 什么是打包压缩
打包指的是将多个文件和目录合并为一个特殊文件
然后将该特殊文件进行压缩
最终得到一个压缩包
2. 为什么使用压缩包
1.减少占用的体积
2.加快网络的传输
3. Windows的压缩和Linux的有什么不同
windows: zip rar(linux不支持)
linux: zip tar.gz tar.bz2 .gz
如果希望windows的软件能被linux解压,或者linux的软件包被windows能识别,选择zip.
PS: 压缩包的后缀不重要,但一定要携带.
4. Linux下常见的压缩包类型
| 格式 |
压缩工具 |
| .zip |
zip压缩工具 |
| .gz |
gzip压缩工具,只能压缩文件,会删除源文件(通常配合tar使用) |
| .bz2 |
bzip2压缩工具,只能压缩文件,会删除源文件(通常配合tar使用) |
| .tar.gz |
先使用tar命令归档打包,然后使用gzip压缩 |
| .tar.bz2 |
先使用tar命令归档打包,然后使用bzip压缩 |
ps:windows下支持.rar,linux不支持.rar
打包压缩与解压缩方法
 1
 2
 3
 4
 5
 6
 7
 8
 9
10
11
12
13
14
15
16
17
18
19
20
21
22
23
24
25
26
27
28
29
30
31
32
33
34
35
36
37
38
39
40
41
42
43
44
45
46
47
48
49
50
51
52
53
54
55
56
|
# 1、打包
[root@localhost test]# tar cvf etc_bak.tar /etc/  # c创建 v详细 f打包后文件路径
ps:
    打包的目标路径如果是绝对路径,会提示:tar: 从成员名中删除开头的“/”,不影响打包,
    添加-P选项便不再提示:tar cvPf ...

    可以cd 到 /etc下然后tar cvf etc_bak.tar *打包,这样去掉了一层文件夹

# 2、压缩
[root@localhost test]# gzip etc_bak.tar   # 文件体积变小,并且加上后缀.gz
ps:
    gzip -> gunzip
    bzip2-> bunzip2

#3、上述两步可以合二为一
[root@localhost test]# tar czvf etc1_bak.tar.gz /etc/  # 选项z代表gzip压缩算法

[root@localhost test]# tar cjvf etc1_bak.tar.bz2 /etc/  # 选项j代表bzip2压缩算法


#zip压缩
选项:

    -r      #递归压缩  压缩目录

    -q      #静默输出

# 示例1、
[root@localhost ~]# zip /test/bak.zip a.txt b.txt c.txt  # zip后的第一个参数是压缩包路径,其余为被压缩的文件
  adding: a.txt (stored 0%)
  adding: b.txt (stored 0%)
  adding: c.txt (stored 0%)

[root@localhost ~]# ls /test/
bak.zip

# 示例1、
[root@localhost ~]# zip  -rq  etc.zip  /etc  # 加上-q后压缩过程不再提示


#1、针对xxx.tar.gz 或者 xxx.tar.bz2,统一使用
[root@localhost test]# tar xvf 压缩包 -C 解压到的目录  # 无需指定解压算法,tar会自动判断

#2、针对xxx.zip,用unzip
选项:

    -l      #显示压缩包的列表信息

    -q      #静默输出

    -d      #解压到指定的目录
[root@localhost test]# unzip -q xxx.zip -d /opt
|
拓展时间命令 date
 1
 2
 3
 4
 5
 6
 7
 8
 9
10
11
12
13
14
15
16
17
18
19
20
21
22
23
24
25
26
27
28
29
30
31
|
#选项

-d         #根据你的描述显示日期

-s     #修改日期

%H         #小时,24小时制(00~23)

%M         #分钟(00~59)

%s         #从1970年1月1日00:00:00到目前经历的秒数

%S         #显示秒(00~59)

%T         #显示时间,24小时制(hh:mm:ss)

%d         #一个月的第几天(01~31)

%j         #一年的第几天(001~366)

%m         #月份(01~12)

%w         #一个星期的第几天(0代表星期天)

%W         #一年的第几个星期(00~53,星期一为第一天)

%y         #年的最后两个数字(1999则是99)

%Y         #年,实际

%F         #显示日期(%Y-%m-%d)
|
使用
 1
 2
 3
 4
 5
 6
 7
 8
 9
10
11
12
13
14
15
16
17
18
19
20
21
22
23
24
25
26
27
28
29
30
31
32
33
34
35
36
37
38
39
40
41
42
43
44
45
46
47
48
49
50
51
52
|
[root@localhost ~]# date
2020年 08月 12日 星期三 20:55:48 CST
[root@localhost ~]# date +%F
2020-08-12
[root@localhost ~]# date +%Y-%m-%d
2020-08-12
[root@localhost ~]#
[root@localhost ~]# date +%y-%m-%d
20-08-12
[root@localhost ~]# date +%T
00:01:03
[root@localhost ~]# date +%H:%M:%S
00:01:11
[root@localhost ~]#
[root@localhost ~]# date +%w
3
[root@localhost ~]# date +%s
1597236988
[root@localhost ~]# date +%d
12
[root@localhost ~]# date +%W
32
[root@localhost ~]# date +%j
225
[root@localhost ~]# date -d "-1 day" +%F
2020-08-11
[root@localhost ~]# date -d "1 day" +%F
2020-08-13
[root@localhost ~]# date -d "+1 day" +%F
2020-08-13
[root@localhost ~]# date -d "3 years" +%F
2023-08-12
[root@localhost ~]# date -d "+3 years" +%F
2023-08-12
[root@localhost ~]# date -d "+3 hours" +%F_%H:%M:%S
2020-08-12_23:58:06

[root@localhost ~]# date -s 20201111
2020年 11月 11日 星期三 00:00:00 CST
[root@localhost ~]# date -s 11:11:11
2020年 11月 11日 星期三 11:11:11 CST
[root@localhost ~]# date -s "20201111 11:11:11"
2020年 11月 11日 星期三 11:11:11 CST

[root@localhost ~]# date +%F
2020-11-11
[root@localhost ~]# date +%T
11:11:29

备份使用
[root@localhost ~]# tar czvf `date +%F`_bak.tar.gz /etc
[root@localhost ~]# tar czvf `date +%F_%H_%M_%S`_bak.tar.gz /etc  # 如果带有时分秒,不要用冒号分隔,因为文件名的命名里不能带有冒号
|
大文件切分
 1
 2
 3
 4
 5
 6
 7
 8
 9
10
11
12
13
14
15
16
17
18
19
20
21
22
23
24
25
26
|
# 生产环境中,一些文件比较大,动则几个G,有的安装包和镜像可达到十几G,但是有些平台显示传输文 件大小,所以一些比较大的文件会被切割上传再合并。
# 这里介绍了个比较常用简单的切割方式split
[root@localhost ~]# split -b 1024m vgpu-0.3.6.tgz
[root@localhost ~]#
[root@localhost ~]# ls
vgpu-0.3.6.tgz  xaa     xab     xac
[root@localhost ~]# ls -lh
total 16206432
-rw-r--r--  1 linhaifeng01  staff   2.6G  8  7 13:03 b.tar
-rw-r--r--@ 1 linhaifeng01  staff   2.6G  8  5 16:22 vgpu-0.3.6.tgz
-rw-r--r--  1 linhaifeng01  staff   1.0G  8  7 13:03 xaa
-rw-r--r--  1 linhaifeng01  staff   1.0G  8  7 13:03 xab
-rw-r--r--  1 linhaifeng01  staff   582M  8  7 13:03 xac
[root@localhost ~]#
[root@localhost ~]#

# 重新合并比对md5值是一致的
[root@localhost ~]# md5 vgpu-0.3.6.tgz
MD5 (vgpu-0.3.6.tgz) = 94583a6e02508d142594701234a080ff
[root@localhost ~]#
[root@localhost ~]#
[root@localhost ~]#
[root@localhost ~]#
[root@localhost ~]# cat x* > b.tar
[root@localhost ~]# md5 b.tar
MD5 (b.tar) = 94583a6e02508d142594701234a080ff
|
